

GUEST POST
Breaking Down Forces and Writing Force Balance Equations

Narin is an A-Level Maths and Physics tutor with 600+ hours' experience and a Mechanical Engineering degree in progress at Imperial College London, focused on clear mechanics reasoning and problem-solving. This article walks through free-body diagrams, choosing axes and directions, resolving components, and writing force balance and ΣF = ma equations, with examples on horizontal motion and inclined planes plus common mistakes to avoid. If you're studying A-Level Maths or A-Level Physics, these steps will strengthen your mechanics problem-solving.
Breaking Down Forces and Writing Force Balance Equations
By Narin T | A-Level Maths and Physics Tutor | Sherpa Tutor
Force questions can look completely different from one another, but most of them come down to the same few steps:
Identify the forces acting and draw a free-body diagram (FBD).
Choose a direction and set up your axes (x and y).
Resolve the forces along your axes.
Write the force equation.
This comes up constantly in both A-Level Maths Mechanics and A-Level Physics, and it also features in GCSE Physics. The notation can look slightly different, but the underlying idea is exactly the same.
The most important equation is:
Resultant force = mass × acceleration
or:
ΣF = ma
A very common mistake is assuming that forces always balance. They do not!
If acceleration is zero along a particular axis, the forces balance along that axis:
ΣF = 0
If acceleration is zero in all directions, the object is in equilibrium. This means it is either stationary or moving at constant velocity.
1. Start With a Force Diagram
Before writing any equations, identify every force acting on the object.
Some of the most common forces are:
Weight, W = mg, acting vertically downwards
Normal reaction, N or R, acting perpendicular to a surface
Tension, T, acting along a string and always pointing away from the object
Friction, resistance or drag, acting against the direction of motion or attempted motion
Driving force or thrust
Once you have identified the forces, draw them on your FBD with the correct direction and line of action.
2. Set Up Your Axes and Choose a Positive Direction
This is one of the easiest ways to avoid sign mistakes.
Suppose the object is moving to the right → take right as positive.
A force pointing right is therefore positive, and a force pointing left is negative.
So, if tension acts to the right and friction acts to the left:
T - F = ma
That is your equation of motion.
You could technically choose left as positive instead, but then you would have:
F - T = m (-a)
Both equations describe the same situation.
It does not matter which direction you choose; you will get the same answer. What matters is staying consistent with your chosen direction throughout the whole question. If you take right as positive in part (a), keep right as positive in parts (b), (c), etc.
3. Break a Force Into Components
Whenever you draw your free-body diagram and see a force acting at an angle to your chosen axes, you need to break it down into components along those axes.
A useful way I tell my students to decide whether to use sine or cosine is:
The component touching the angle uses cos θ.
The component in front of the angle uses sin θ.
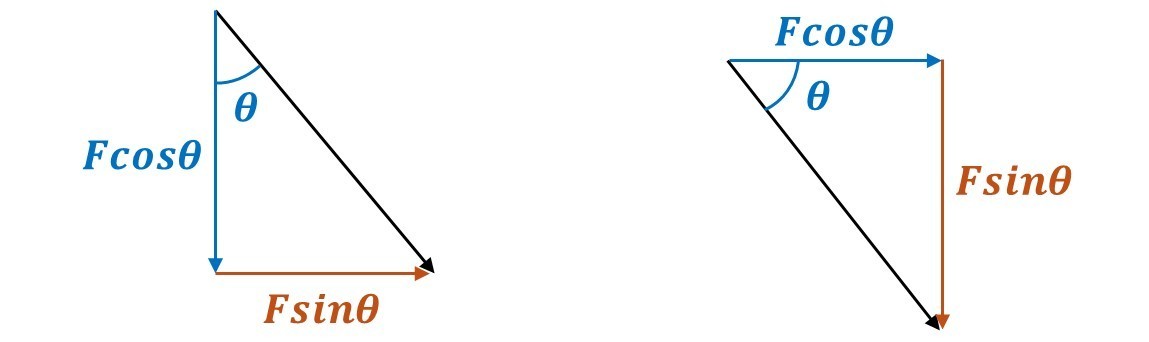
Do not automatically assume horizontal means cosine and vertical means sine. It depends on where the angle is measured from.
Example 1: Horizontal Motion
Suppose a 10 kg box is pulled along a horizontal floor by a force of 50 N, acting at 30° above the horizontal, on a rough surface with a frictional force of 15 N.
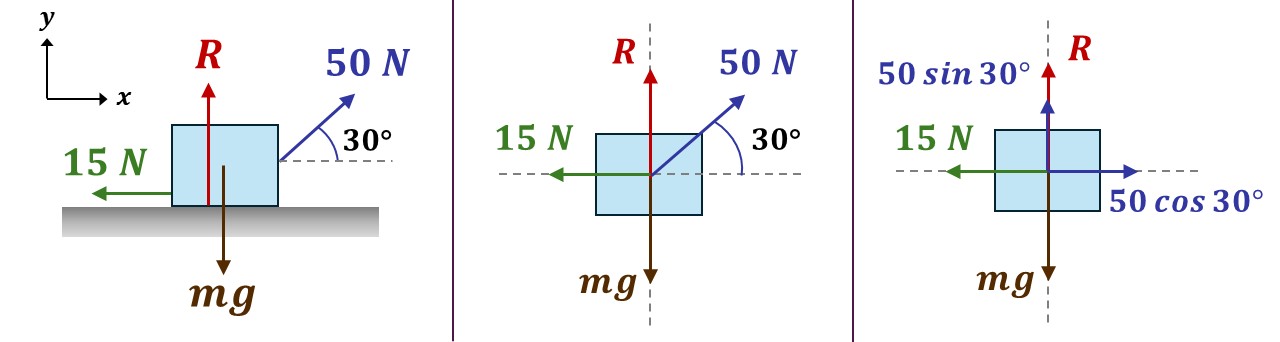
The horizontal component of the pulling force is 50 cos 30°.
Taking forwards as positive:
50 cos 30° - 15 = 10a → a = (50 cos 30° - 15) / 10
The box remains in contact with the horizontal floor, so there is no vertical acceleration.
This means the vertical forces must balance:
R + 50 sin 30° - 10g = 0 → R = 10g - 50 sin 30°
This is why we treat the horizontal and vertical directions separately. Along x, the box accelerates, so we use ΣF = ma. Along y, there is no acceleration, so the forces balance.
Example 2: Inclined Planes
Suppose a 5 kg block is on a smooth slope inclined at 30°, with a 50 N force acting up the slope. Find its acceleration.
For inclined planes, it usually becomes much easier if you tilt your view so that your axes are aligned with the slope and choose:
x-axis parallel to the slope
y-axis perpendicular to the slope
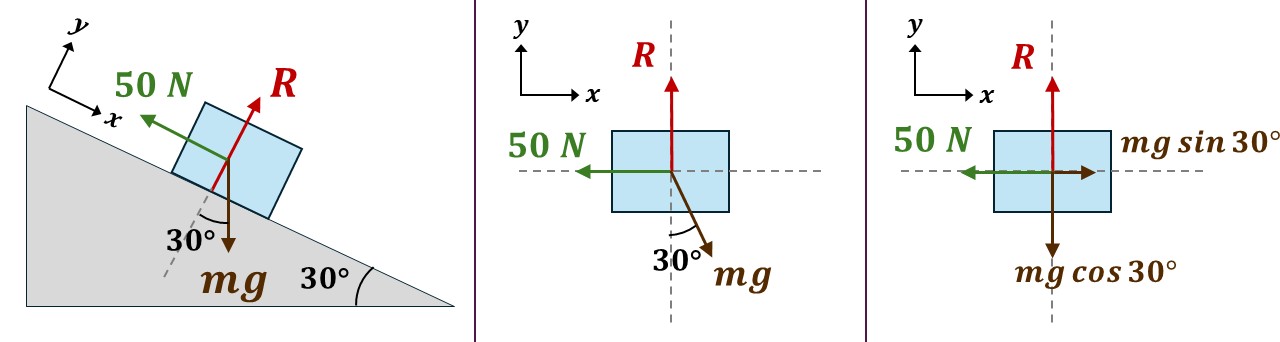
Step 1: Tilt Your View and Set Up Your Axes
Instead of thinking horizontally and vertically, imagine rotating the diagram so the slope becomes your new x-axis and then you will have:
x is parallel to the surface
y is perpendicular to the surface
Step 2: Break Down Any Force That Is Angled to Your New Axes
Weight, mg, still acts vertically downwards, so it is now at an angle to both the x and y axes.
Resolve it into:
mg sin 30° along the slope
mg cos 30° perpendicular to the slope
Step 3: Write the Force Equation Along the x-axis
Along the slope, the forces are:
mg sin 30° down the slope
50 N up the slope
Taking down the slope as positive:
mg sin 30° - 50 = ma → a = (mg sin 30° - 50) / m → a = g sin 30° - 50 / 5 → a = -5.1 m/s²
The negative sign means the acceleration is opposite to our chosen positive direction.
Therefore, the block accelerates at 5.1 m/s² up the slope.
Step 4: Write the Force Equation Along the y-axis
The block remains in contact with the slope, so there is no acceleration perpendicular to the surface:
a = 0
Therefore, the forces balance along the y-axis:
ΣF = 0 → R - mg cos 30° = 0 → R = mg cos 30°
This is a good example of why it helps to work one axis at a time. Along x, the block accelerates, so we use ΣF = ma. Along y, there is no acceleration, so the forces simply balance.
A Step-by-Step Method for Force Questions:
Draw an FBD and identify all the forces.
Choose your axes and positive directions.
Resolve any angled forces along those axes.
Apply ΣF = ma separately along each axis.
If acceleration along an axis is zero, use ΣF = 0.
Common Mistakes
Assuming R = mg
This is only true when weight and reaction are the only forces acting in that direction and there is no acceleration along that axis.
If there is another force with a vertical component, this may no longer be true.
Putting Forces From Different Directions Into the Same Equation, Especially Using the Full Angled Force
If a force acts diagonally, only part of it acts along each axis.
Resolve it first, then use the correct component in each equation.
Getting Sine and Cosine Mixed Up
Remember:
Touching the angle → cos θ
In front of the angle → sin θ
Do not assume horizontal always uses cosine.
Forgetting That Constant Velocity Means Zero Acceleration and Zero Resultant Force
If velocity is constant, a = 0.
So: ΣF = 0.
The object can still be moving. The forces just have to balance.
Final Takeaway
Most force questions become much simpler once you stop trying to solve everything at once.
Think one direction at a time.
Forces in the positive direction - forces in the opposite direction = ma.
Then repeat along the other axis if needed.
If a force is angled, resolve it first.
If the acceleration in a direction is zero, the forces in that direction balance.
Once you get comfortable with these ideas, force questions with angled forces, slopes, friction and tension all start to follow the same pattern.
Students

Narin T
Tutor
Imperial College Engineering Student | A-Level & GCSE Maths and Physics | 50% Off First Lesson



Looking for a tutor?
Sherpa has hundreds of qualified and experienced UK tutors who are ready to help you achieve your goals. Search through our tutors and arrange a free 20 minute introduction through our industry-leading online classroom.
Find a TutorSimilar Articles
How to write an analytical GCSE English essay
The best ways to write an analytical GCSE English essay.

Ruth D
16th September